Today’s post is about cross stitch. Did you know that you can do cross stitch with EmbroideryWare? I never though of attempting this but one of users, Ed, did and he did a fantastic job. He wrote me the following instructions. Ed thanks for the material….you make this blog easy to write! ☺
Note: Ed has given me permission to post his design files here. Eds design files. Please consider these designs as Ed’s copyright so only use them for personal use.
Ed starts with …… I’m told patience is a virtue..!
Patience is a definite pre-requisite to the Cross Stitch problem and its solution.
The issues are:
1. Size – I settled on 1.9 mm – as best I could determine 1.9 mm closely matched the stitch size on commercially available XStitch designs. However, you should be able to resize to whatever suits yours design needs.
2. Jump Stitches – unless you make long jumps there is no good way to clip 1.9 mm jumps. So I spent significant time placing/solving extra stitch pattern solutions – right angle & zig zag to connect horizontal or slanted stitch patterns.
3. The many color combinations are obviously very close together. In order to avoid some jumps between colors I actually “changed the color” in the stitchout file in order to force the machine to stop. Therefore I could manually move to the next stitch start position.
4. There are two basic Stitch Pattern Files I used. You can modify directions/connections of the stitchout with “Reverse Point Order” and “Flip Stitch Pattern” commands.
a. Horizontal –

b. Vertical –
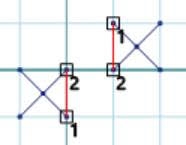
5. Right angle stitches are used at the stitch end/turnaround as needed to avoid jump stitches.

6. Zig-Zag stitches are used to jump several lines where needed – again to avoid jump stitches.

7. Example 1 – Constructed / De-constructed shown below:

8. Example 2 – Slanted stitch pattern

9. Final Stitchout on Black Felt.

10. Holding light behind final stitchout to see density of stitch holes.

13. The End… J or Beginning… J
P.S. A very important habit “at least to me” that I started not long ago and it really seems to make a difference… “Sewer’s Aid” and a “Q-Tip” – it is a silicon based lubricant that you can apply to the needle “very frequently”… Certainly every time color is changed and depending on the number of stitches I stop the machine and apply… I also apply it to the inside of my metal bobbin and the bobbin casing itself… it really does smooth things out… Thanks, Ed…